I love art, even though I am not a great artist myself. I have an immense respect and appreciation for artists, and I want to help make their lives easier however I can.
Many of my entrepreneurial ideas over the years that never got off the ground involve supporting artists. For a while, I wanted to make a marketplace for artists, something like Redbubble but vaguely better, and then I wanted to make content for artists by talking to people in different disciplines (marketing, law, etc.) to help with all the non-art parts of making a living. Neither of those went much of anywhere.
The Macropod is the latest addition to my “I-want-to-make-something-for-artists” pile. Unfortunately I think it will suffer the same fate of my other ideas — there doesn’t feel like enough here to really make something worthwhile — but, I got a lot farther on this one and learned some things along the way, so I thought I would write a little about it.
Prototyping the Macropod
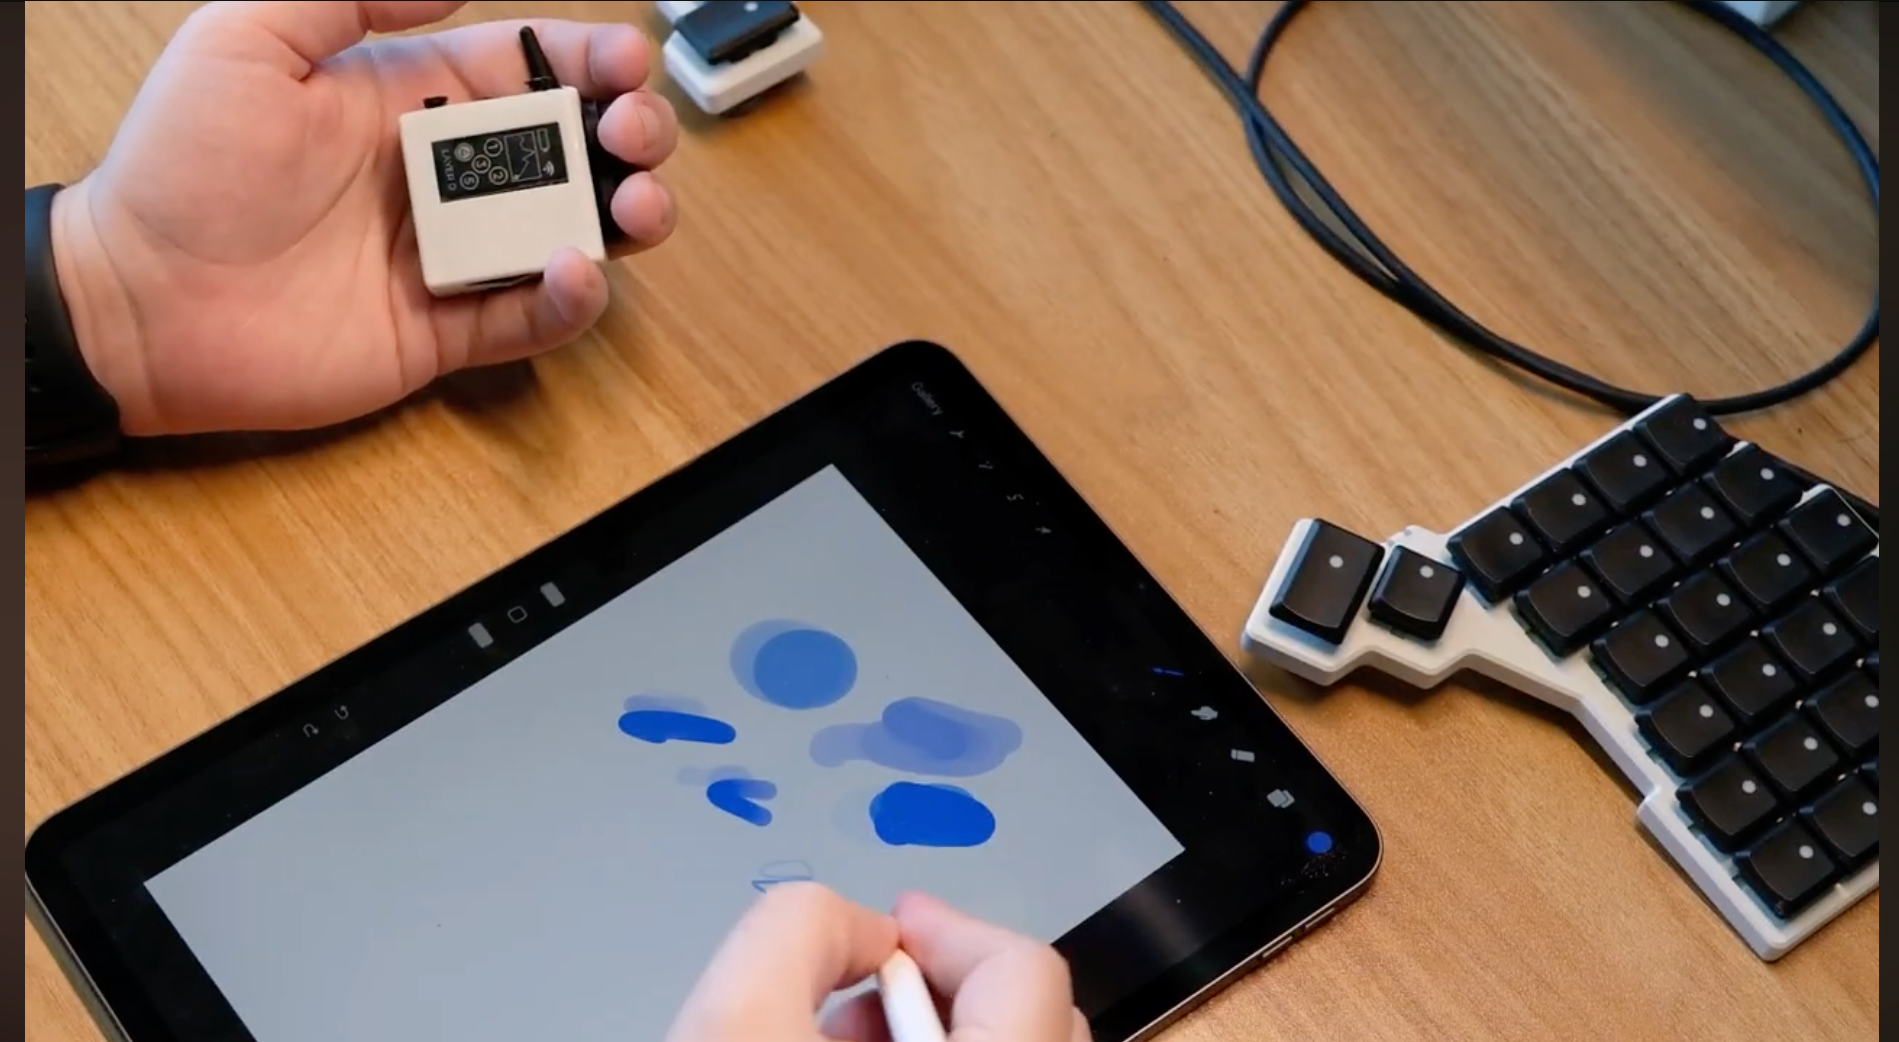
A while back, I read about artists using Switch Joycons as sort-of macropads to trigger shortcuts in art apps, especially on iPads. The advantage of Joycons is they are pretty common, wireless, and easy to use in one hand, all important for artists using a tablet. Yet, to me, Joycons don’t feel like the perfect solution. They are kind of expensive for what they are, and you have to rely on software to map the buttons to do what you want. I started wondering if I could make something better.
The first stage of my prototyping was all about shape. I did a lot of thinking here. What would be comfortable to hold? How big should it be? After some rough sketches, I came up with this non-functional design that I printed just to test the feel of.
You might be able to tell I got inspired by artist palettes. That’s what I was calling it at this stage: the Palette. My idea was that you would have some keys you trigger with your fingers for fast actions, and some keys that you could trigger with your thumb or by tapping them with back of your pen tool, again much like a palette. I also knew I wanted a dial of some kind since adjusting brush size, opacity, and zoom are all crucial when drawing digitally.
After feeling this out a little, I was pretty sure it had to be smaller. I printed another non-functional shell, but this time, I made it so I could install real components in it.
This was definitely better. It made more sense to hold, things were more reachable, and it would allow for a sizable battery. It was also at this stage that I sadly realized I had to abandon the palette inspiration. Threading your thumb through the hole worked, but I couldn’t stop thinking about trying to accommodate all kinds of hand shapes and sizes. Making this a rigid opening just seemed too restrictive.
Wiring and writing code for the Macropod
After a little more thinking, I decided I was going to try to make something roughly the size of Apple Airpods. I figured if Airpods already fit into basically any pocket, my device would, too. I also found a teeny-tiny 5-way switch part that intrigued me. A five-way switch would do the work of 5 separate, single-action switches in less space than one.
I also knew I wanted to try learning a bit more about ZMK, a wireless-forward keyboard firmware alternative to QMK. I knew essentially nothing about ZMK, so I decided to do something I (believe it or not based on my other projects) never did before: I breadboarded.
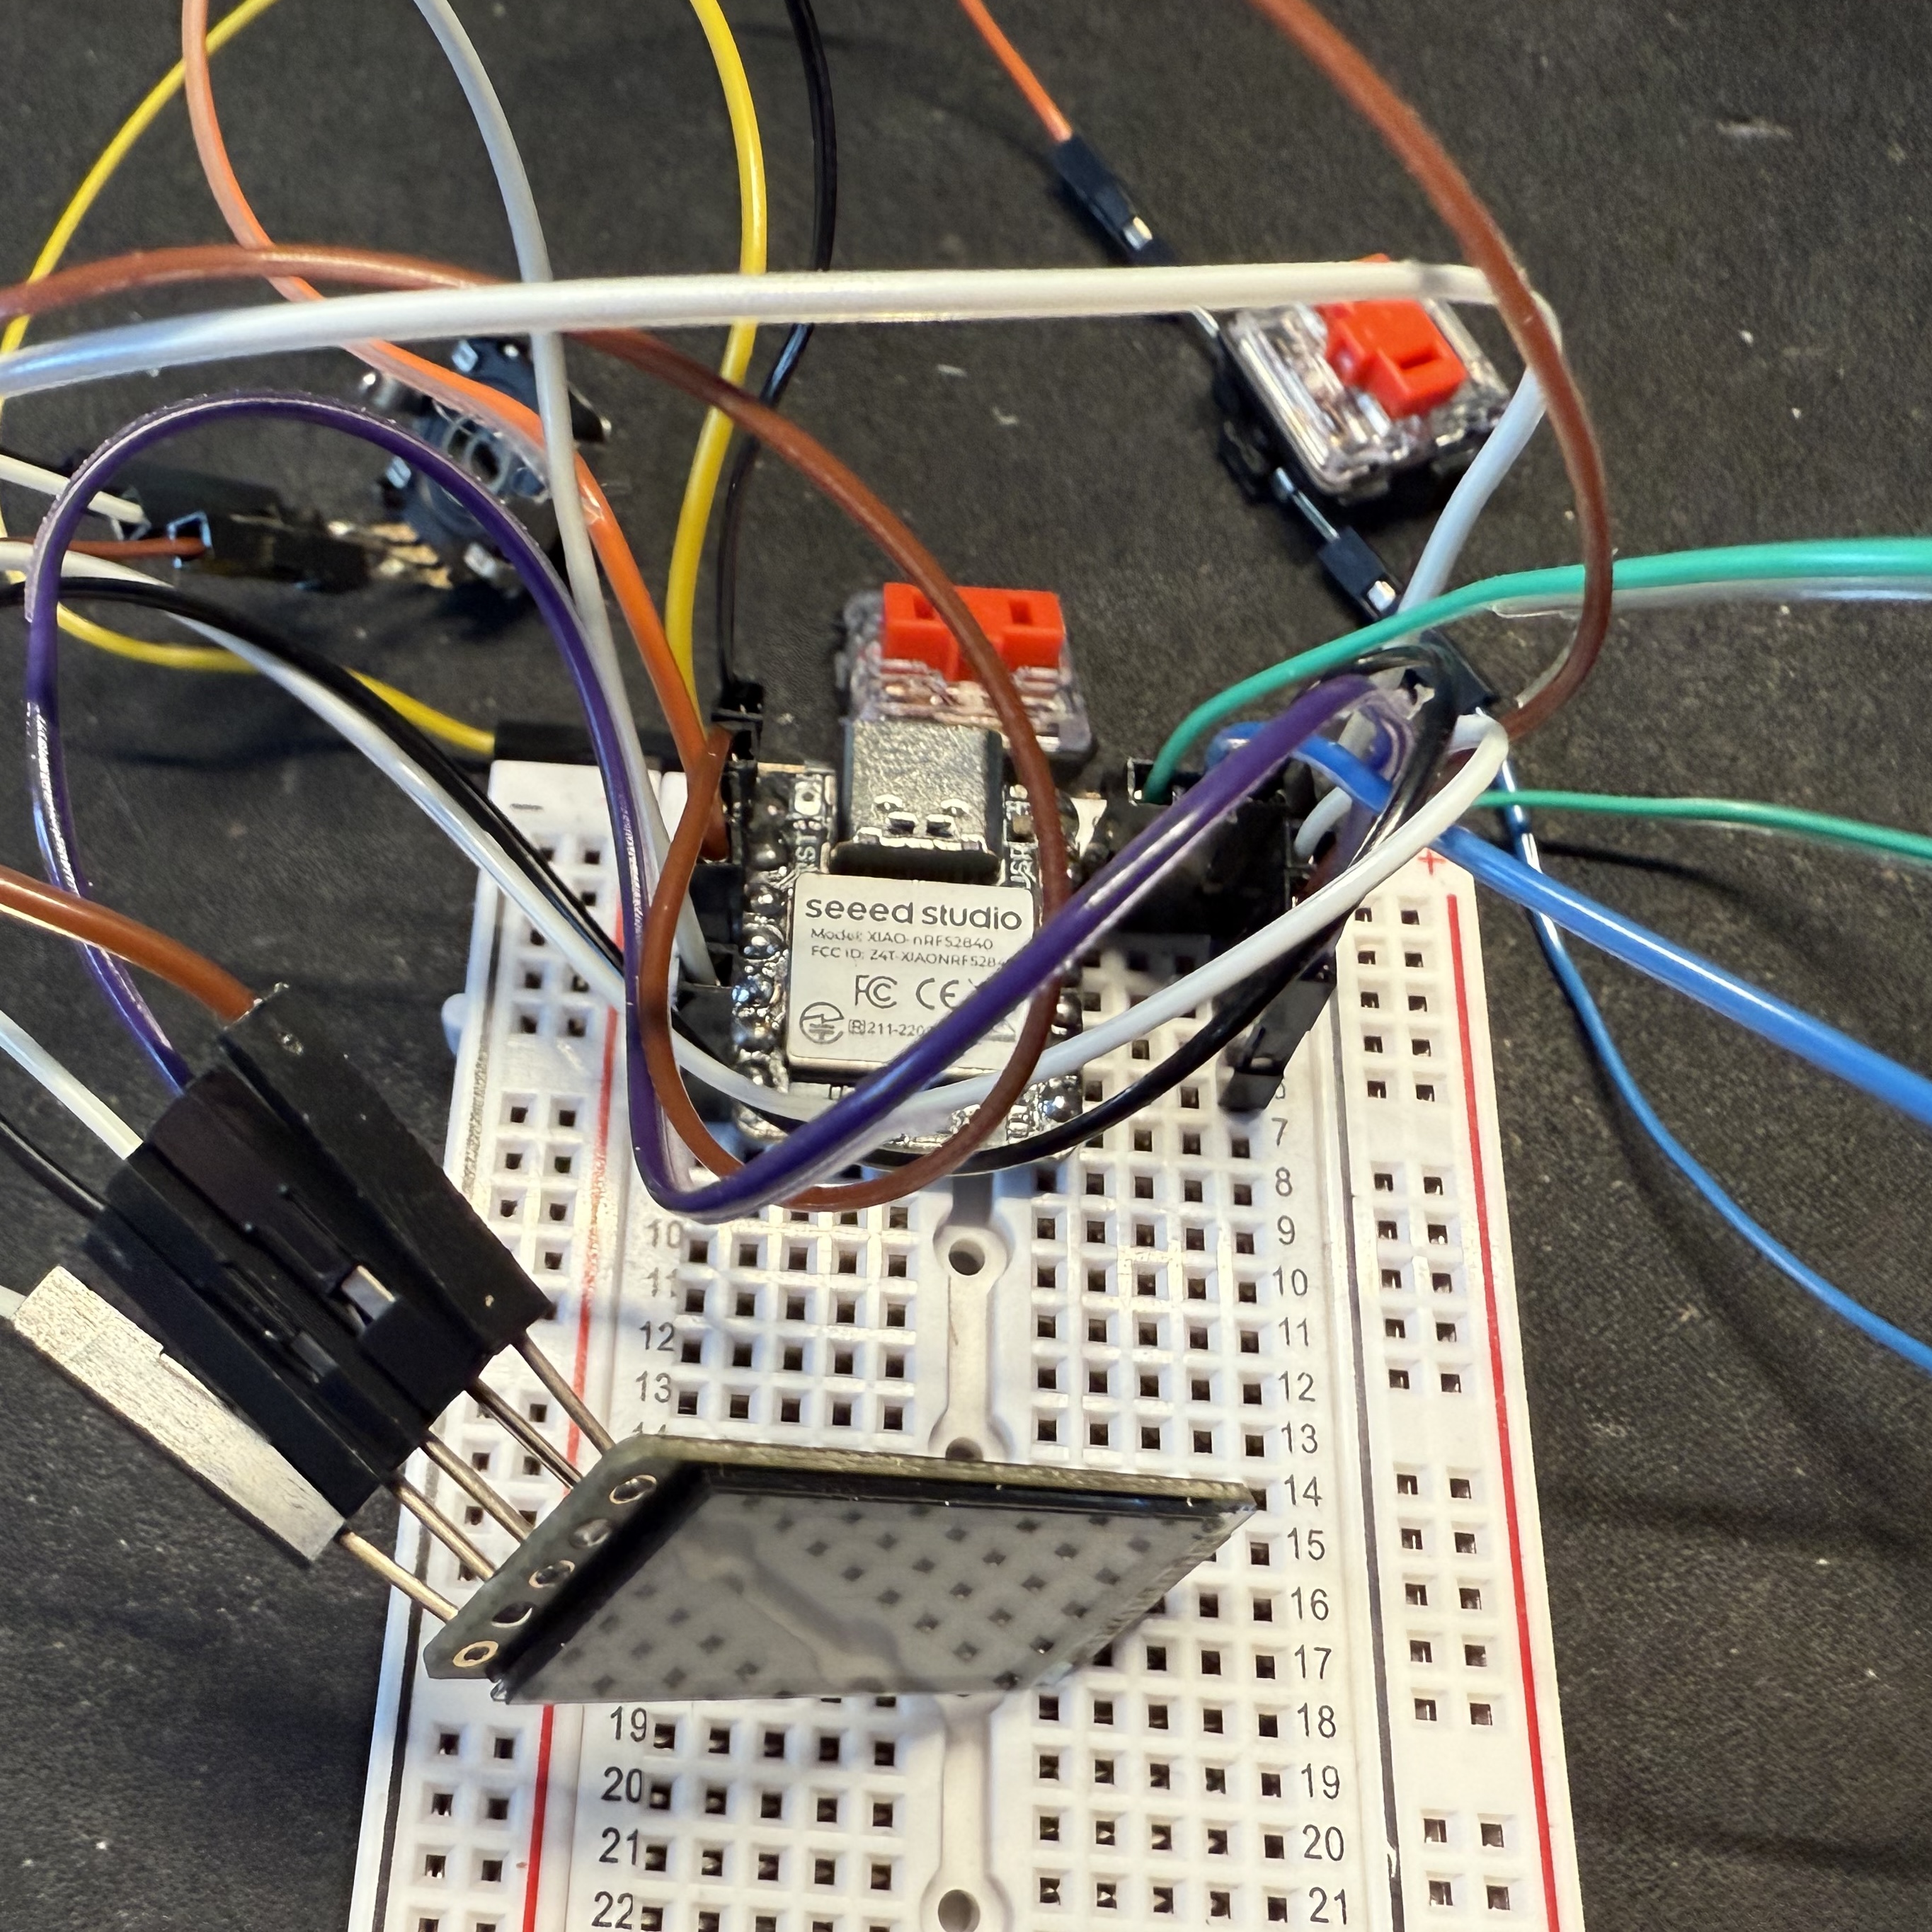
This is how the project existed for a while as I clumsily started to figure out ZMK. I believe I set some kind of record for thinking, “It’s just X, how hard could it be?” and then being immediately humbled.
One mild criticism of ZMK I have is it feels like ZMK wants to be more user/novice-friendly than QMK, which is admirable, but it is definitely not there yet, at least in my opinion. There are more guard rails set up, but the process of building firmware, especially something custom, is honestly far more confusing to me than QMK. I am biased, of course, being much more familiar with QMK and not that much of a programmer at the end of the day, but still; I found ZMK extremely frustrating for a while. Now that I understand it a little better, I still don’t have a ton of desire to use it. That’s my little ZMK rant.
Once I finally had the code working with the breadboard prototype, it was time to get PCBs printed. One major problem: goods from China were now being taxed at ridiculously high rates for inane reasons I won’t get into (but I’m sure you’re aware of). “No problem,” I thought, “I’m sure I can get PCBs printed in the US.”
Well, I could, for more than twice the cost and more than four times the wait. I don’t necessarily blame the service I used — maybe they were super busy with orders — but, from this anecdotal experience, printing PCBs in the US it not it. Later, when I was trying a variation of the design, I ended up paying for Chinese-printed PCBs because the math worked out in their favor even after the tax.
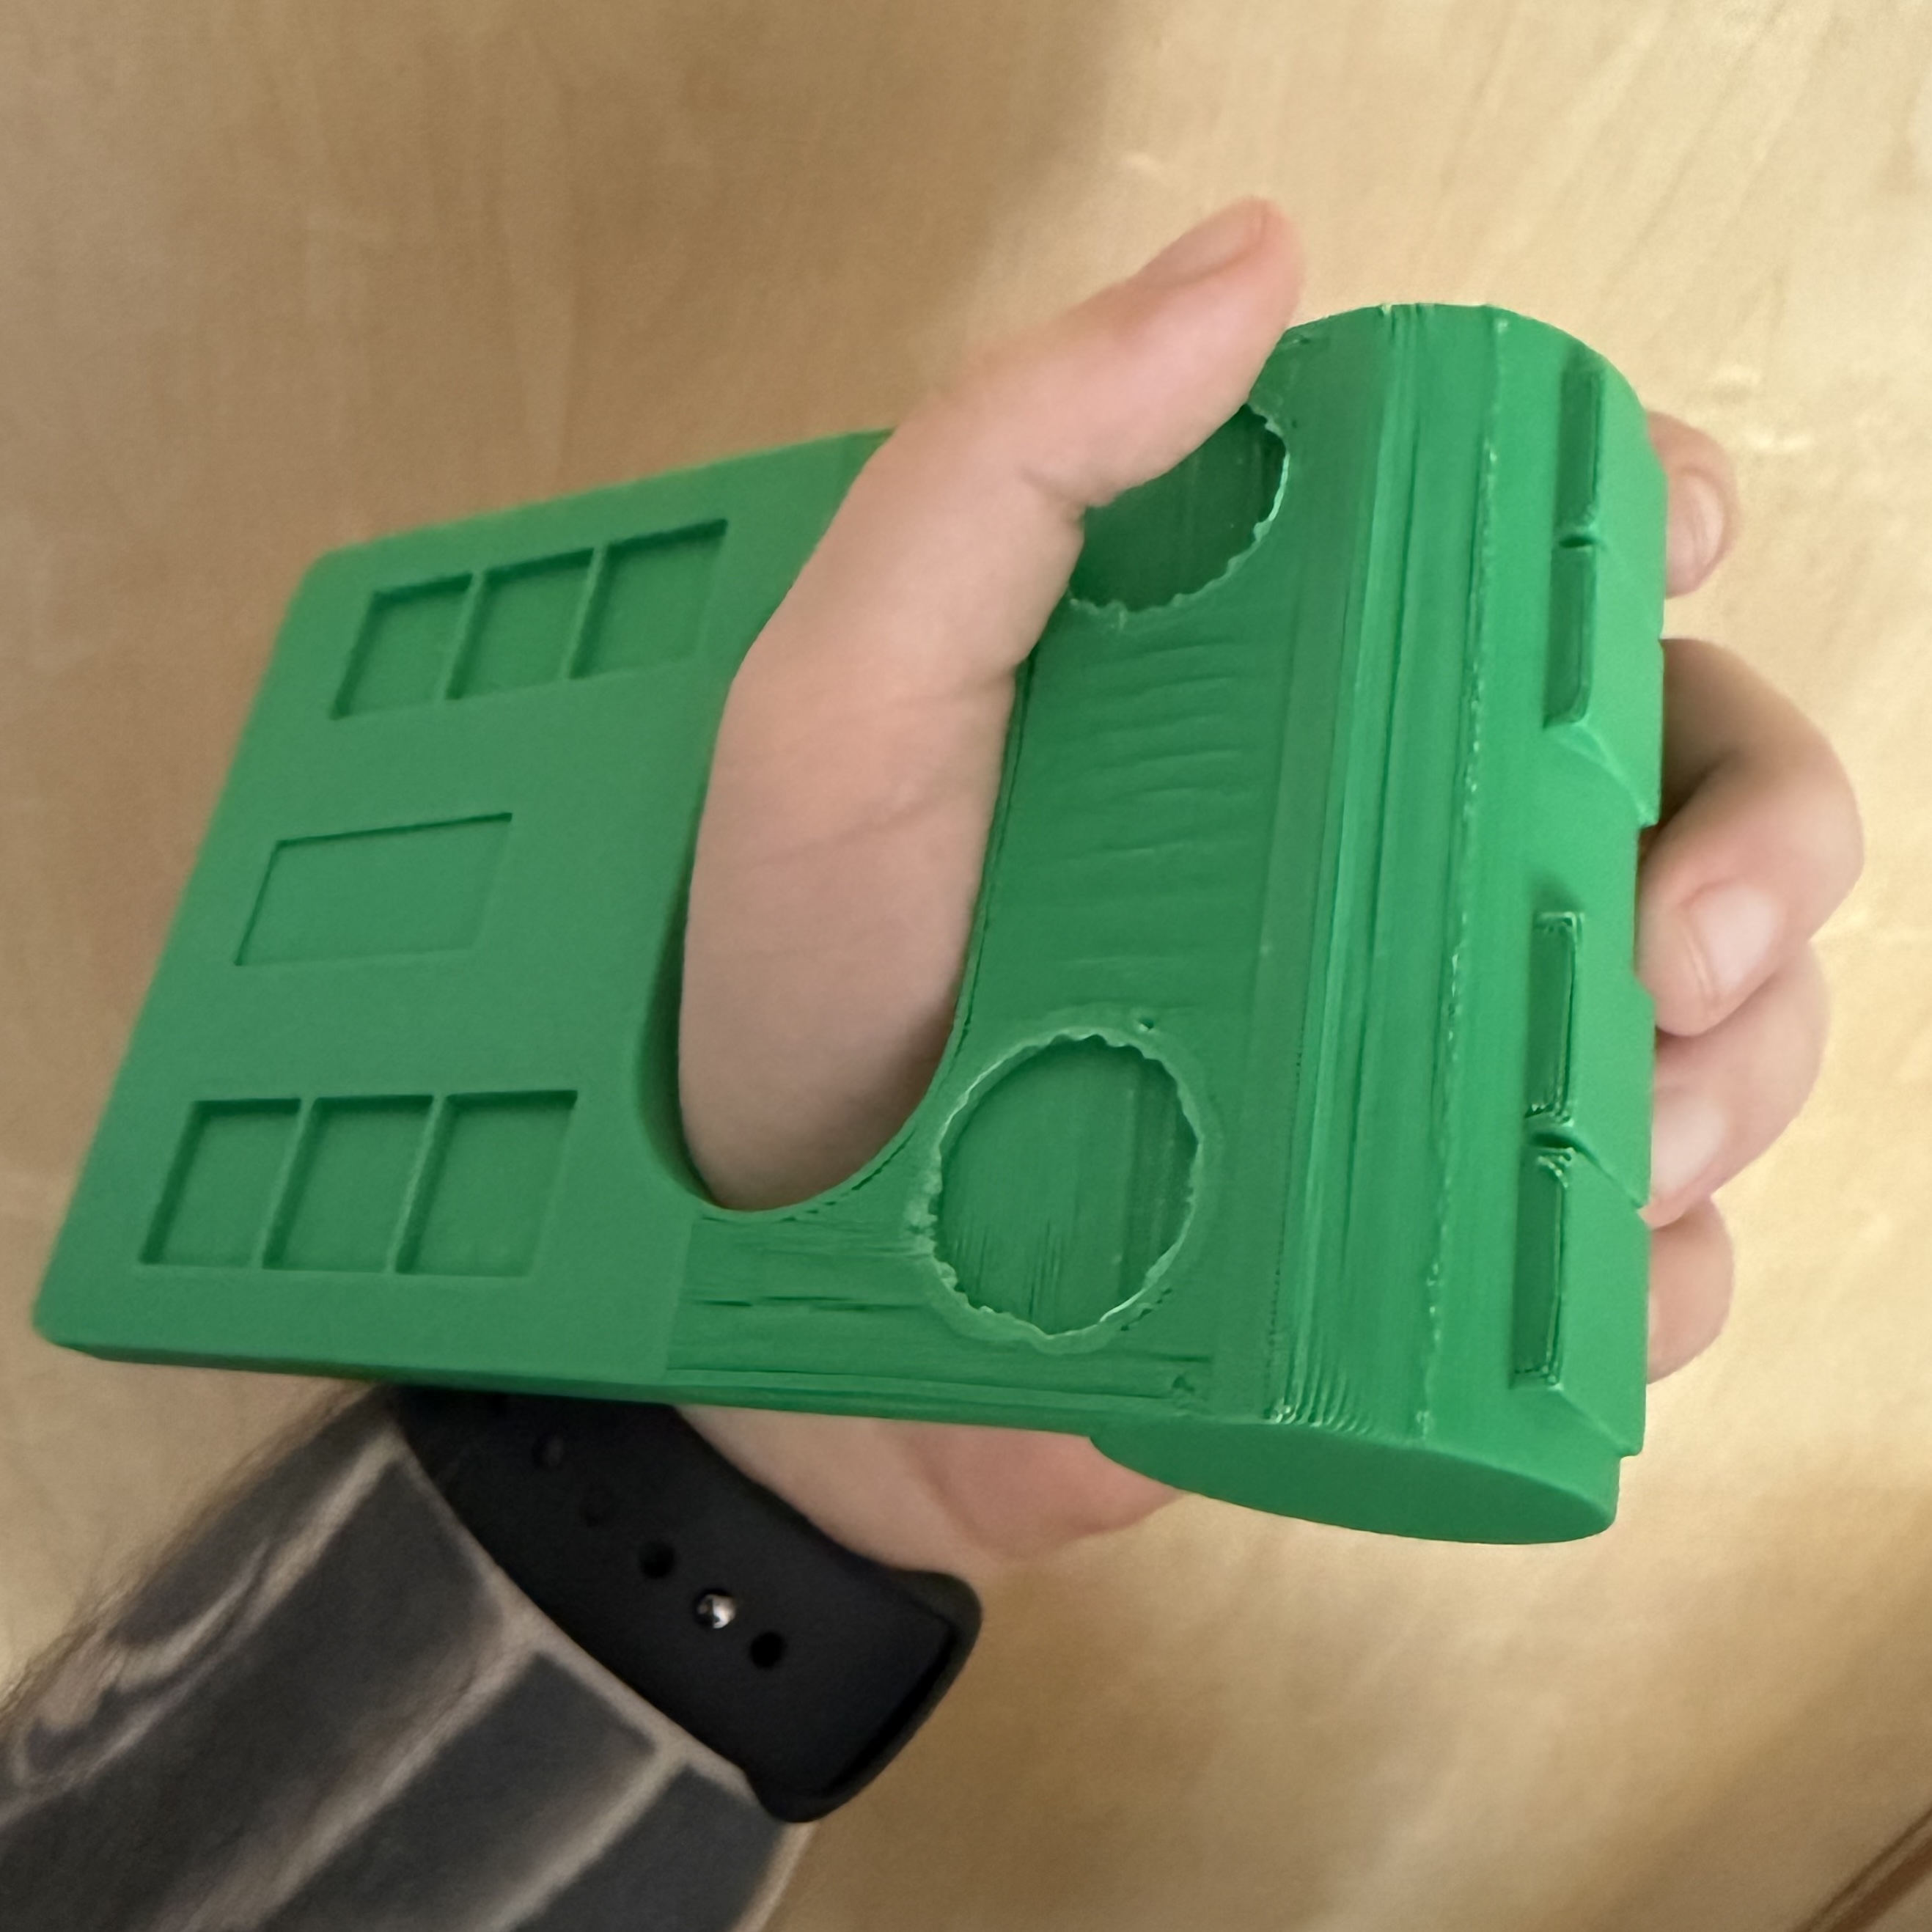
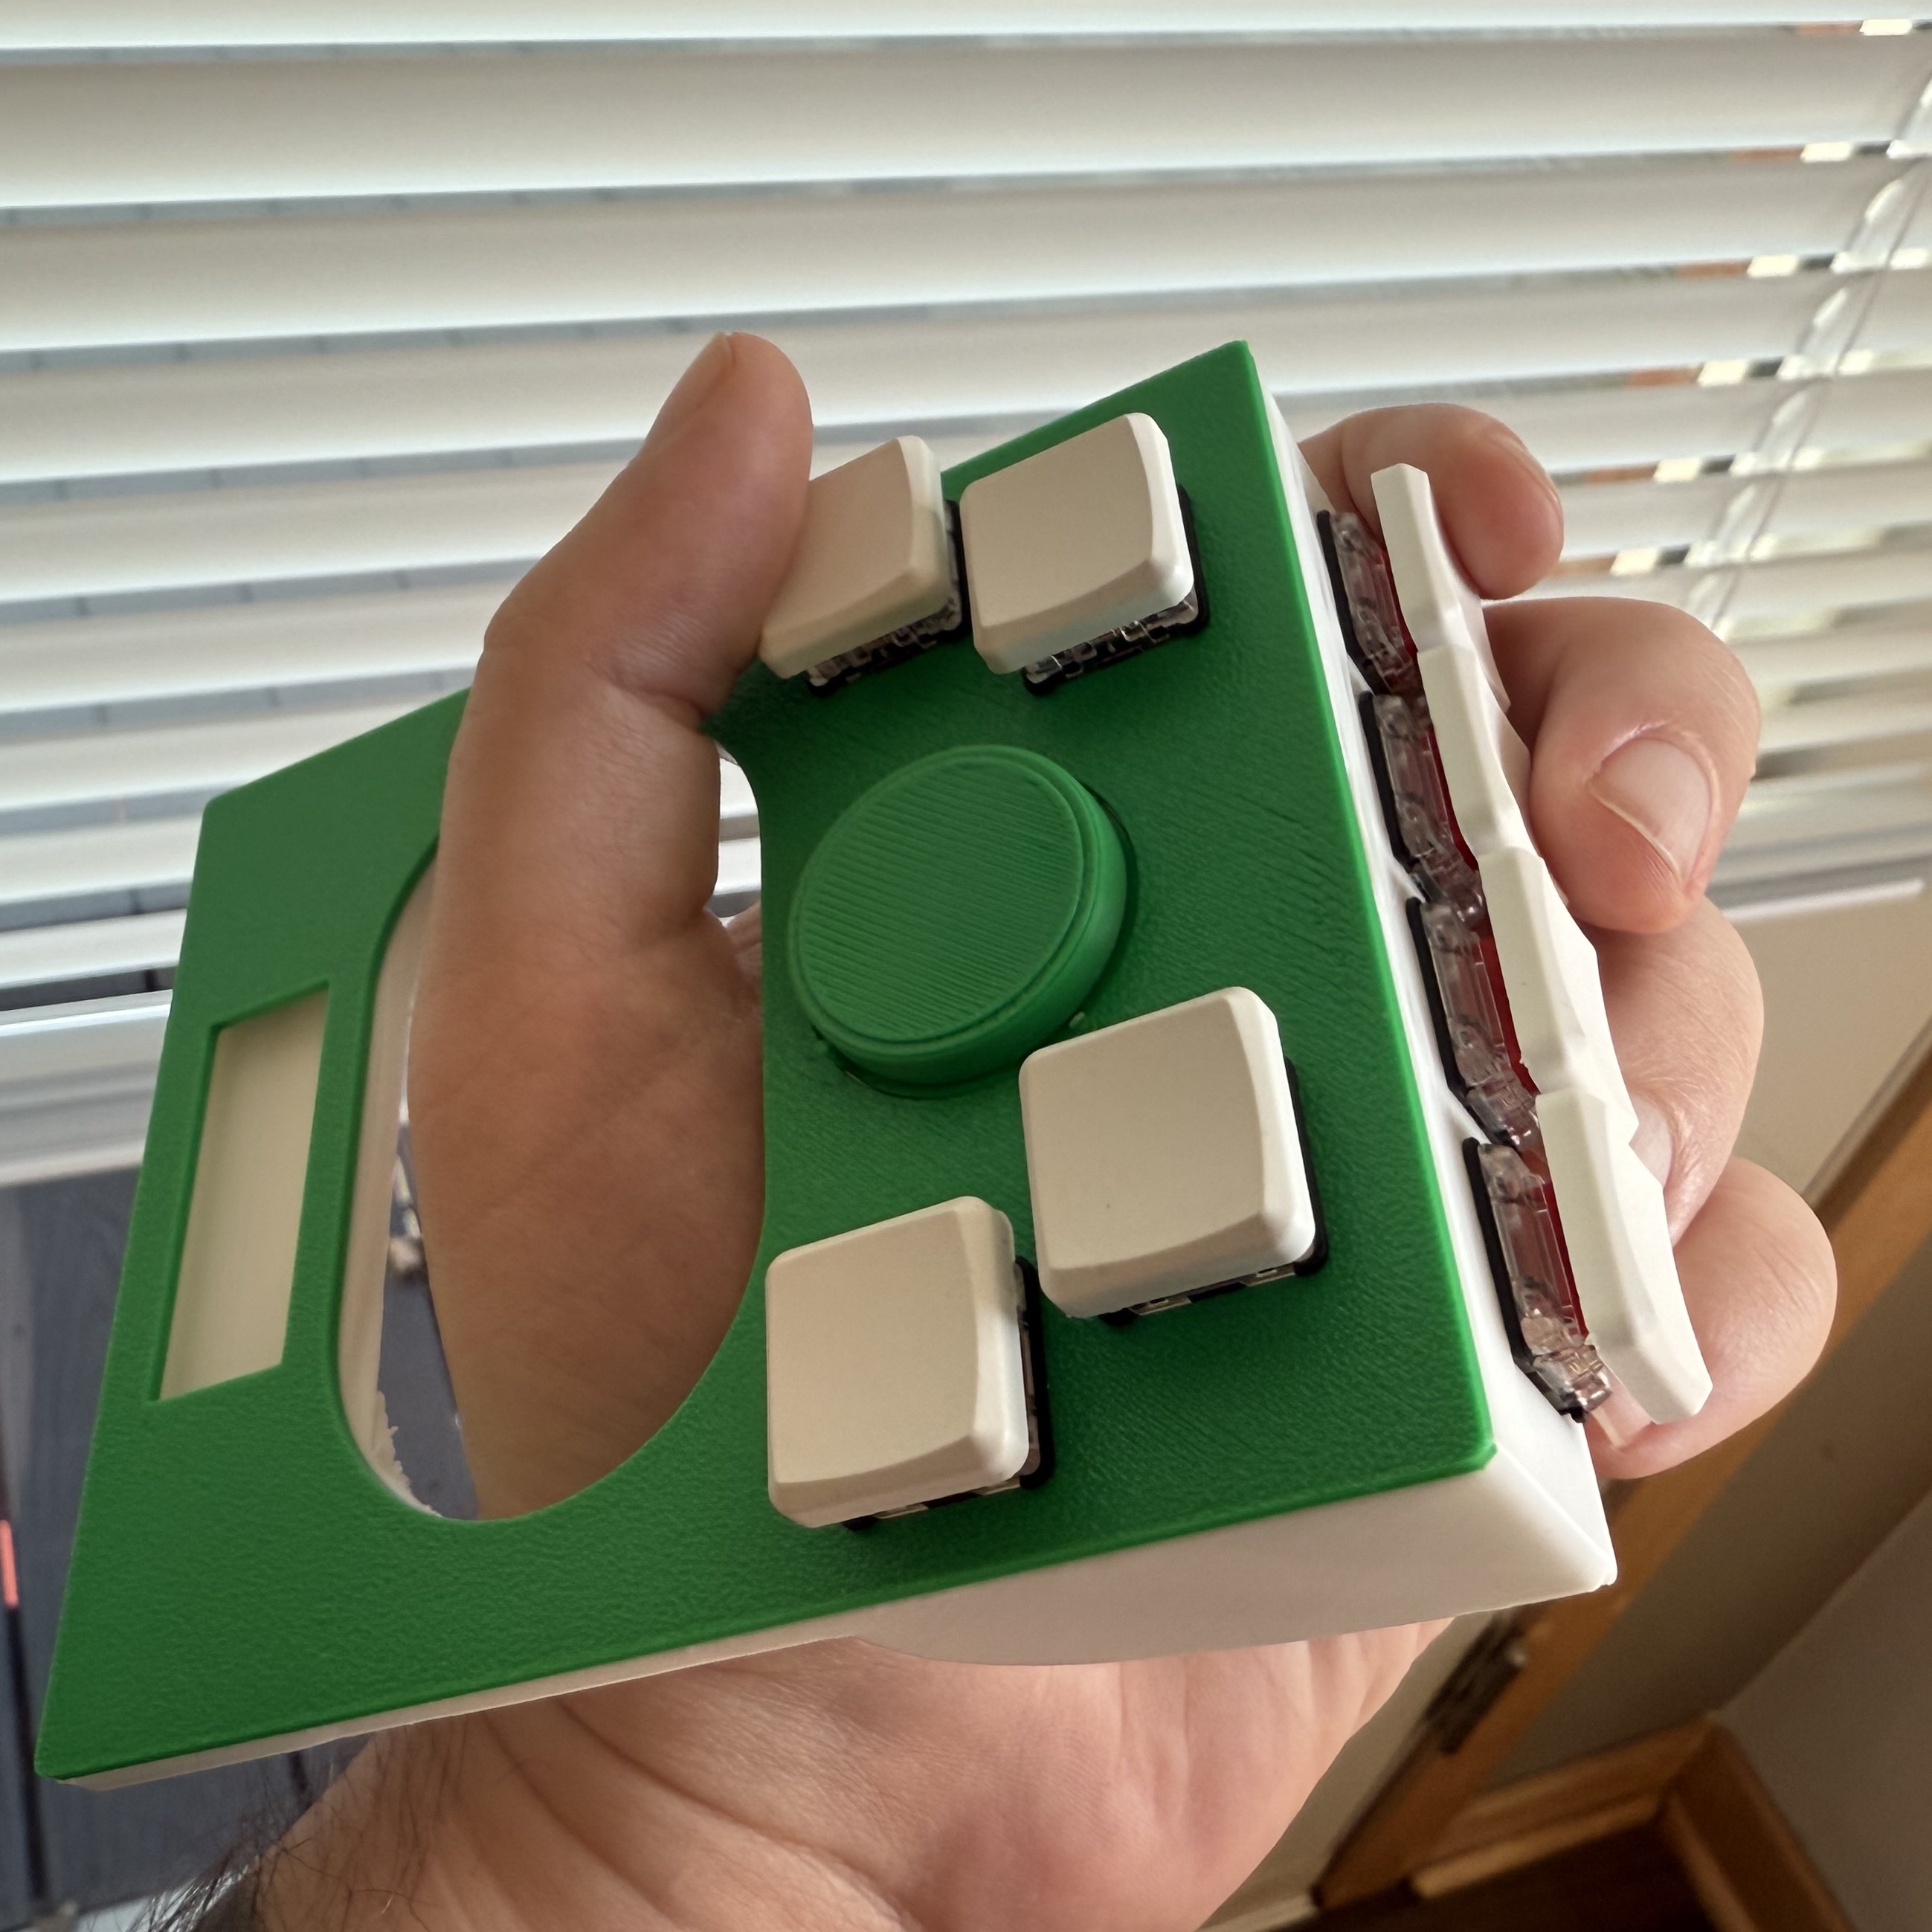
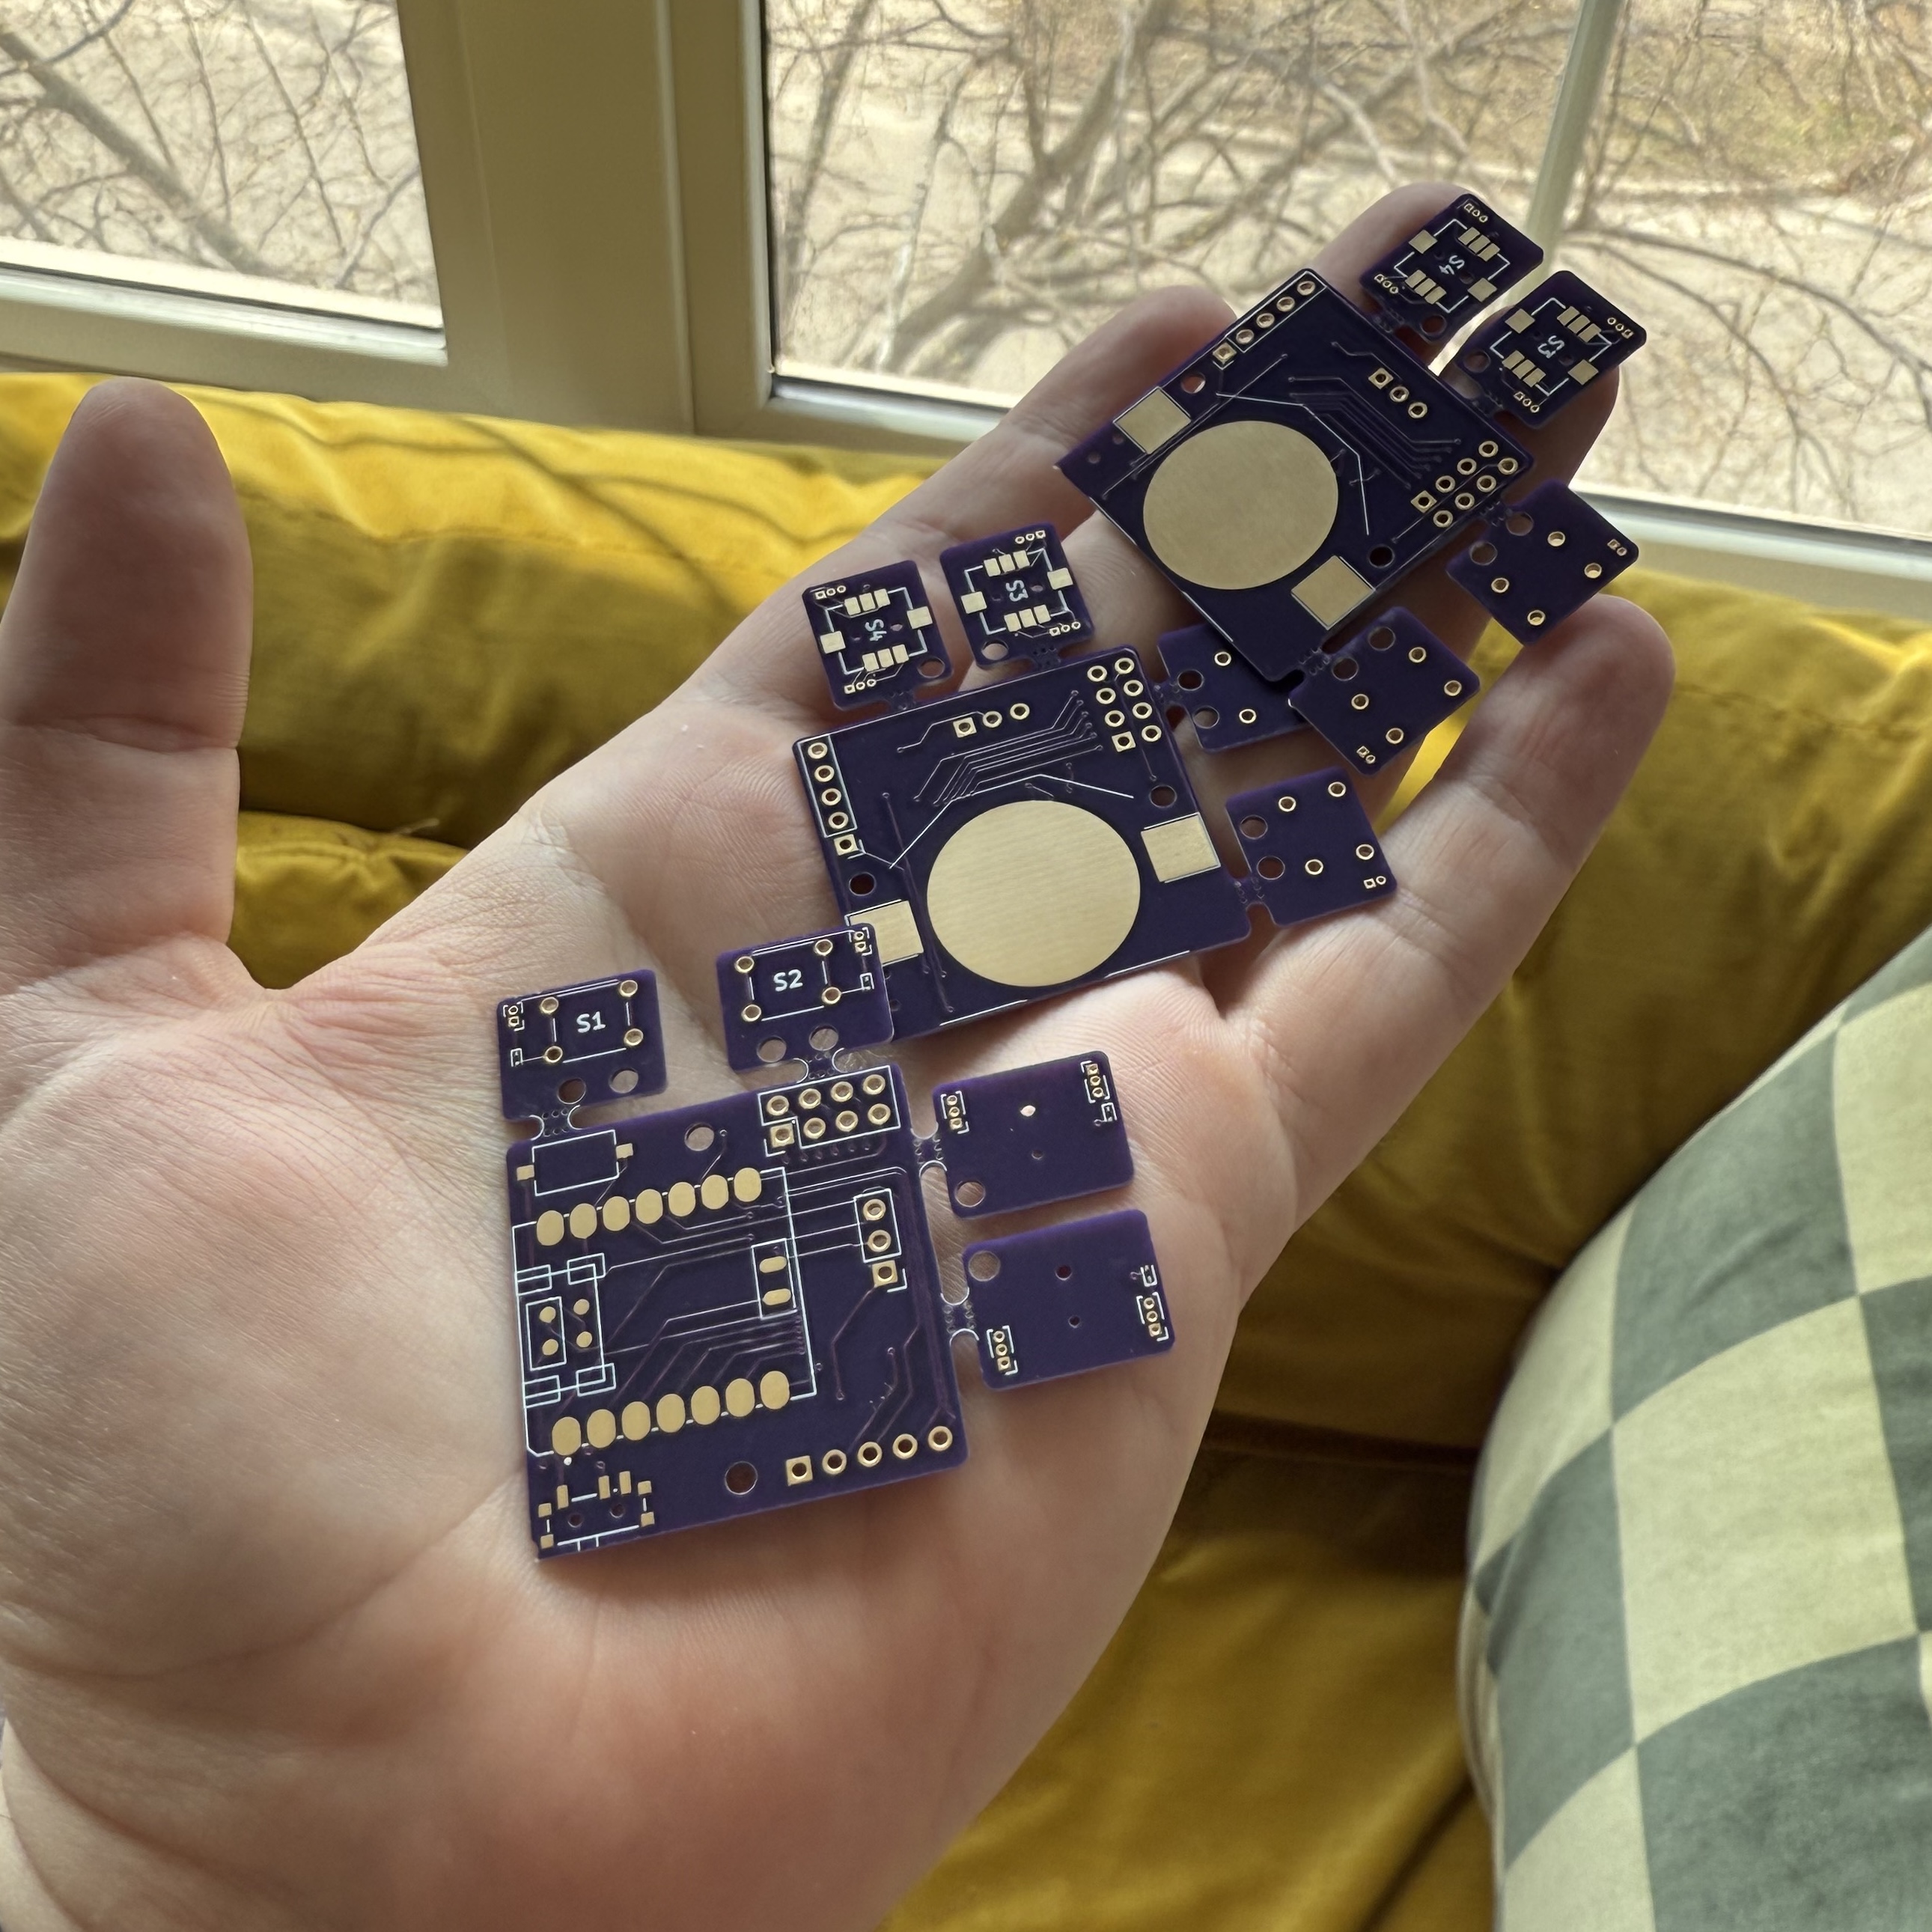
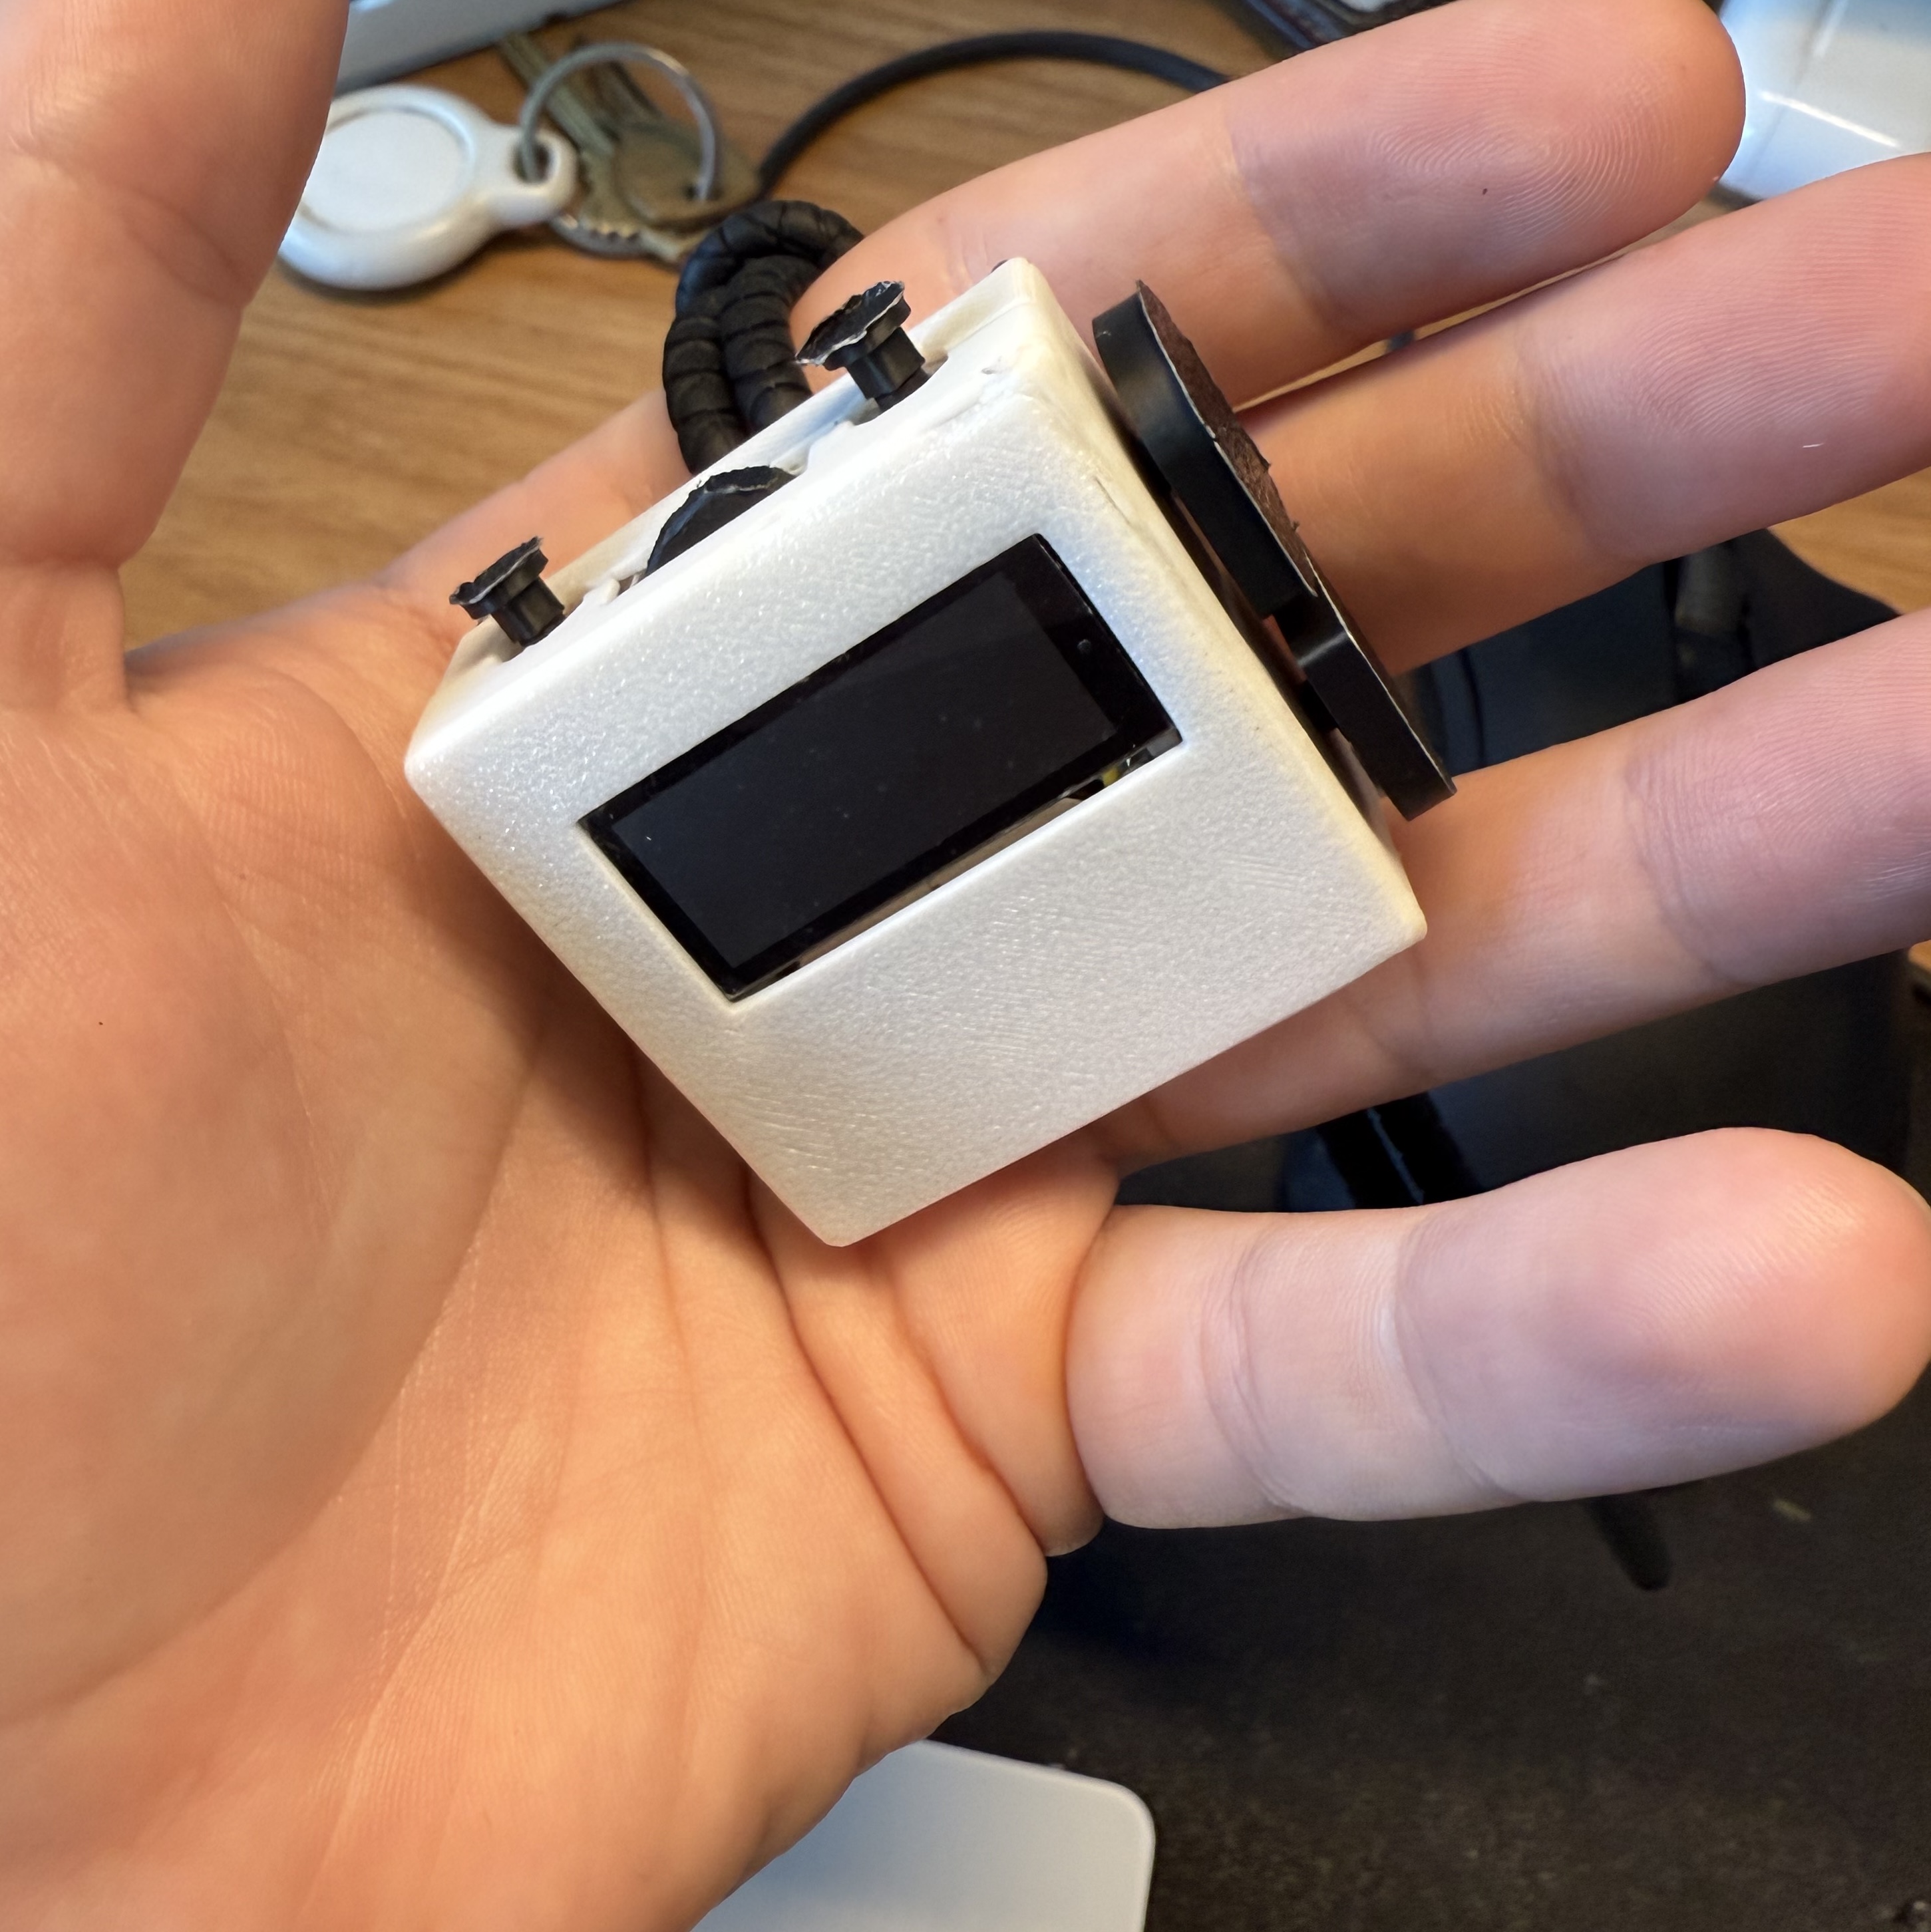
But, PCBs finally in hand, I got to work on the real prototype. Somewhere around here is when I started calling this project the Macropod, a play on macropad and the Airpods case. My idea was pretty good, I thought: the PCB would be the center of the whole thing with some parts connecting on one side and some on the other. The switches each got their own tiny daughterboards that I would physically attach to the main PCB with a 3D-printed skeleton, and electronically with some thin wires. All of this would get sandwiched between two halves of an outer case.
This is where I was humbled yet again. I think I’ve gotten halfway-decent at soldering, but trying to connect all these little wires in a few millimeters of space was challenging, to say the least.
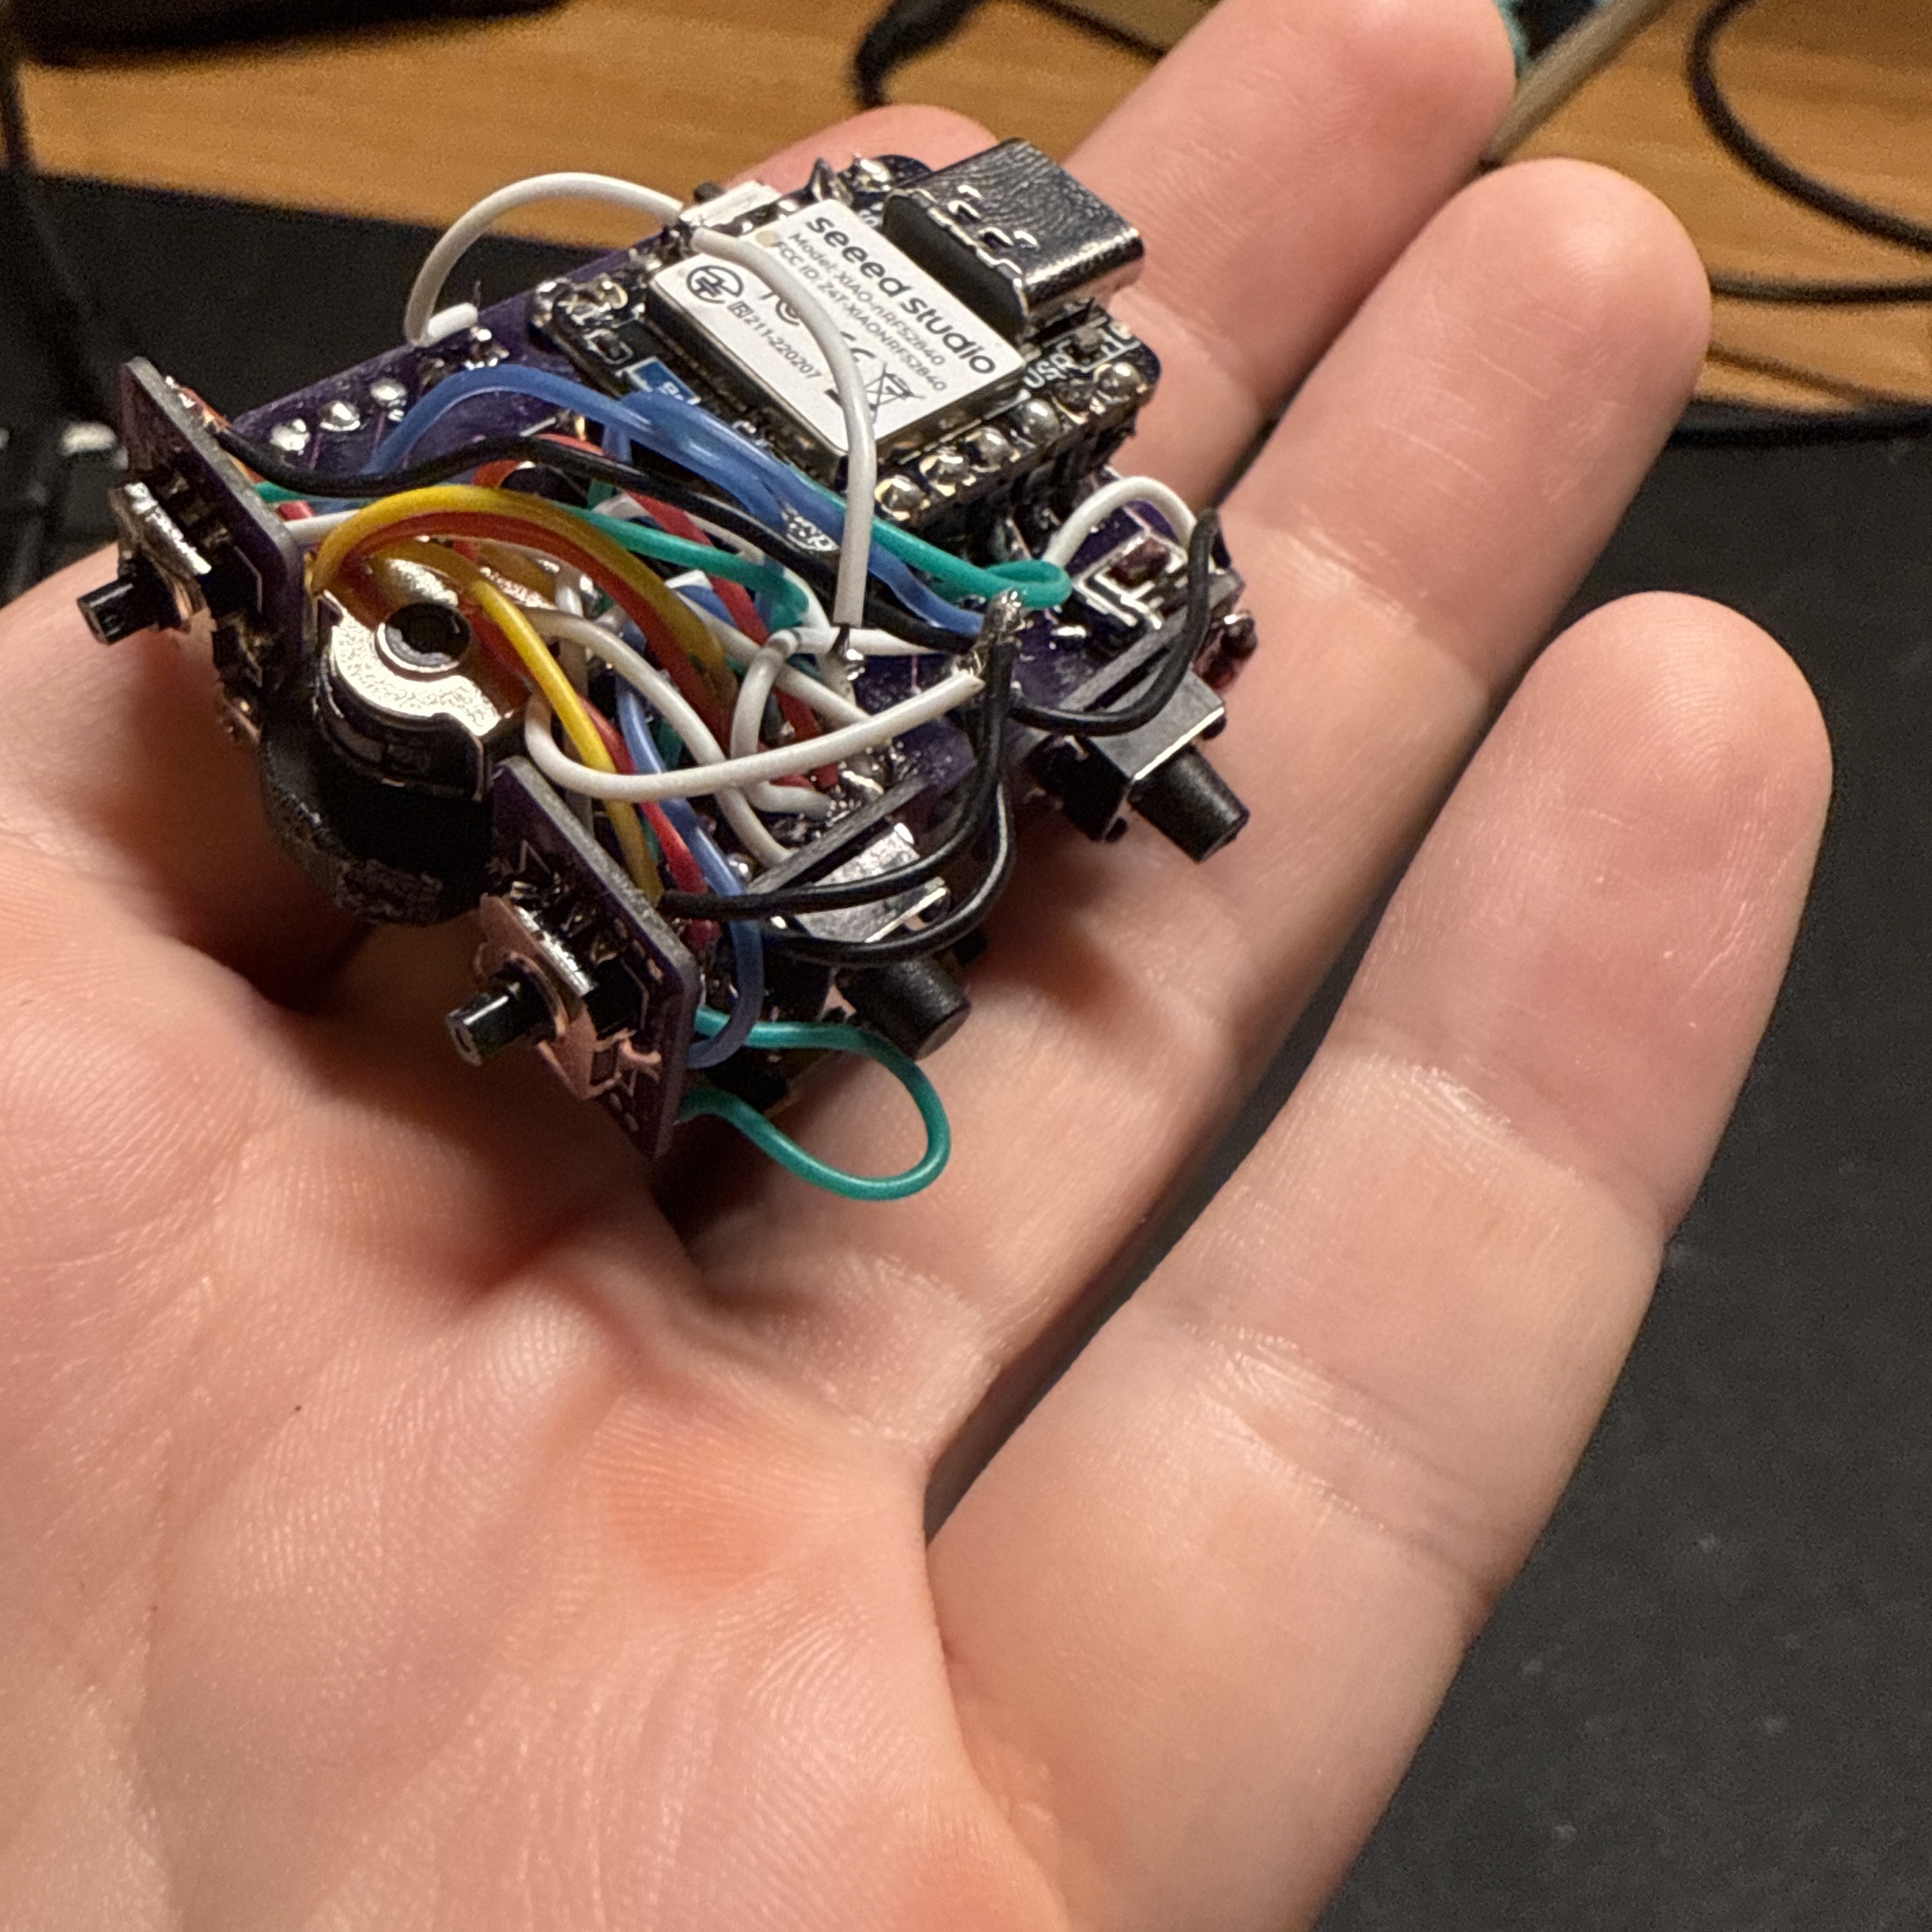
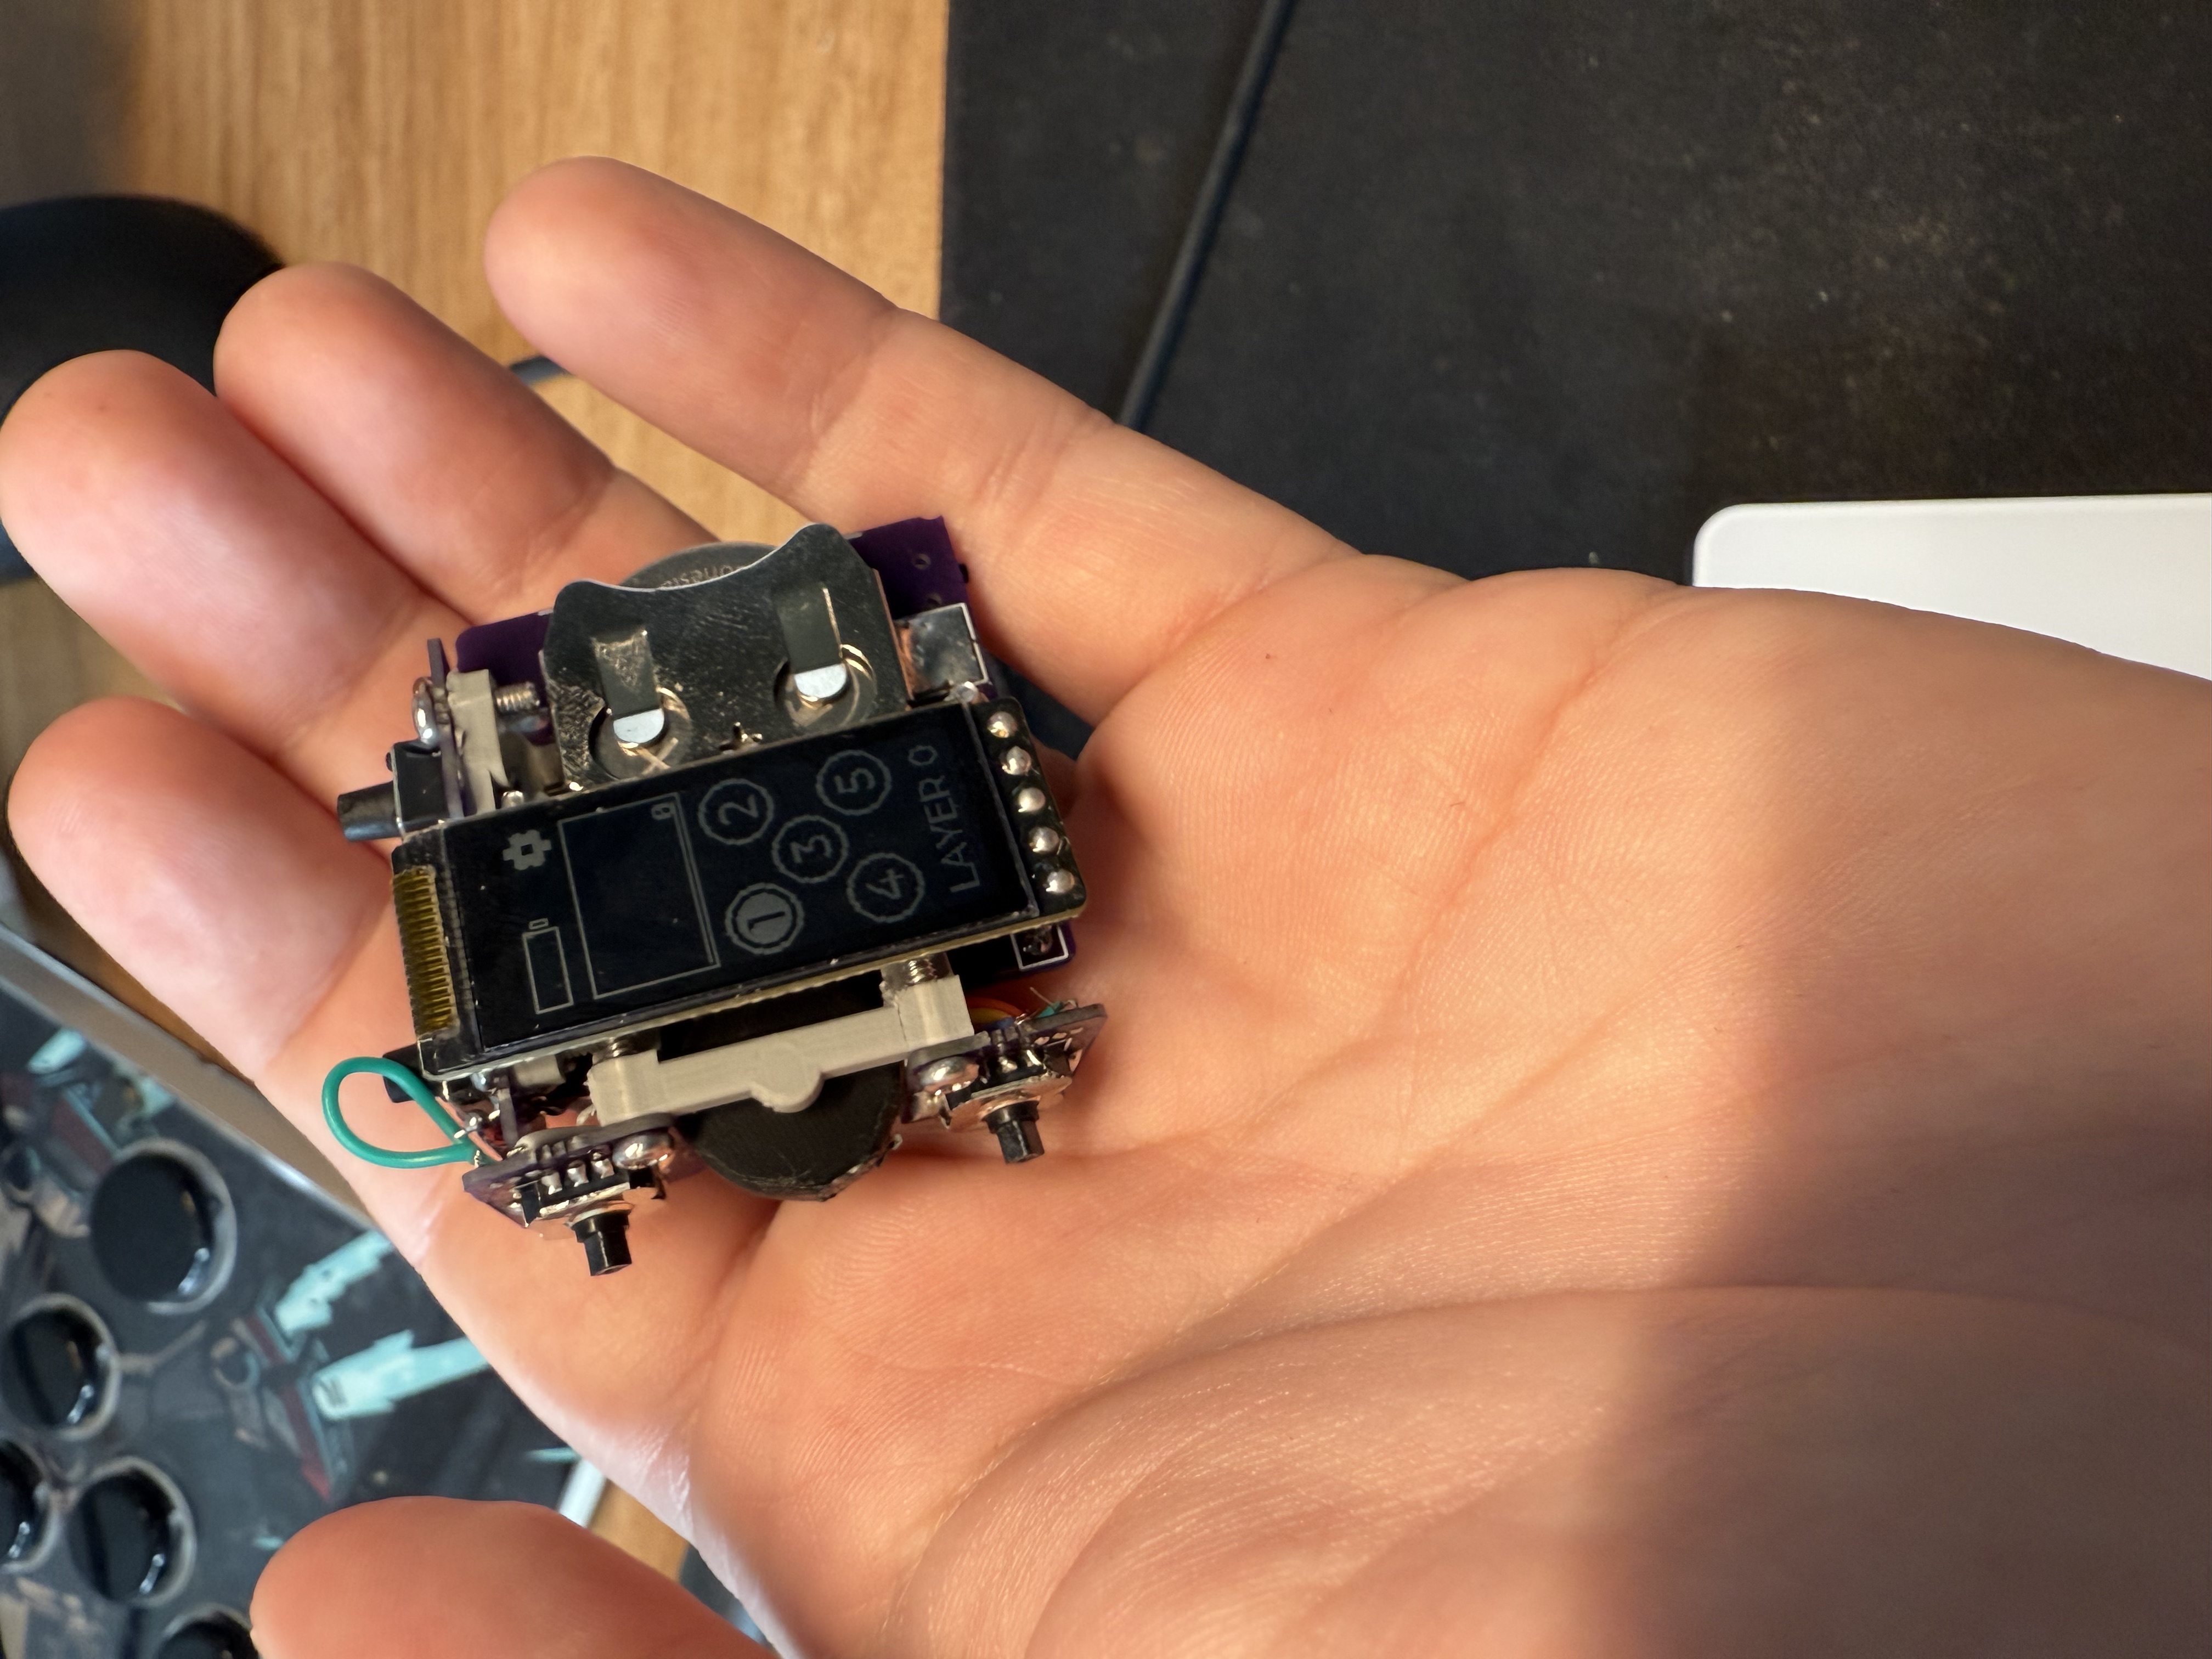
I persisted and eventually got there, though. I also added a screen on the bottom. It’s just showing ZMK’s default screen graphics, but if I do dive back into the project later, I want to make something custom.
With everything wired, it was time for a moment of truth: could it connect to something wirelessly and send all its inputs?
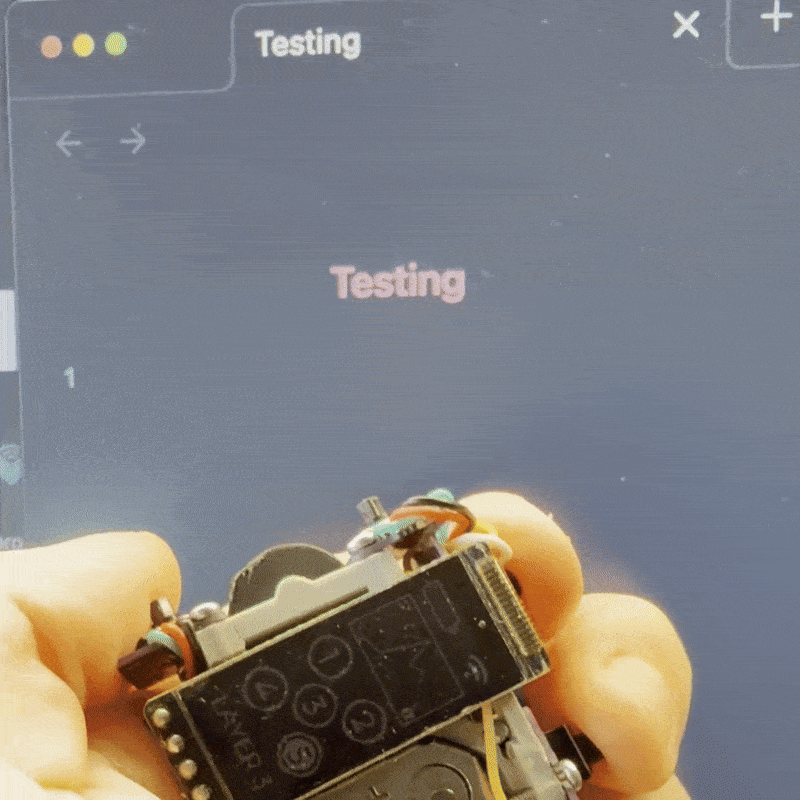
It could! For the most part. This began a long battle of troubleshooting to figure out why a lot of the inputs would work most of the time, but not always. Eventually, I figured out it was the 5-way switches. I underestimated how tricky they would be to solder by hand and get a good connection at each point. After much more soldering and some pleading, I got everything working consistently.
Now that the Macropod is finished, what did I learn?
The final step was some kind of case and button caps. It’s nothing fancy, but it all came together.
So, when does the Macropod hit shelves?! Not anytime soon, at least like this. I got to this stage, sat back and really evaluated, “Is this better than using a Joycon?”
In a lot of ways, yes. It would be cheaper, at least in theory. It has a screen, so you could see exactly what you’re doing with a history of actions, in theory. It has programmable onboard memory, so you don’t need any software running to remap it. This could be done through an easy web UI, in theory. I’m sure you see the pattern.
Despite my progress, there was still a long way to go, and despite the potential benefits, I just started to feel like they weren’t adding up to that much. Better, sure, but not transformative. Not really.
For how much work I had already put into this, and for how much there was still left to do, I decided it was time to put the project down, at least for now. I do think there could be something here, but I think I need to go way back to the drawing board.
So, what did I learn?
- Breadboarding is really cool and not for nerds at all (don’t let anyone tell you otherwise). I will definitely be doing more breadboarding.
- Miniaturization is really hard. I heard this a lot, and it’s not like I didn’t believe it, but sometimes you don’t really understand something until you experience it. Designing something to fit in the palm of you hand, especially that involves a bunch of hand-soldering, is not something I would recommend without a lot of good planning.
- Logic, research, and trial and error gets you far. I attempted a number of things with this project that not only did I not know how to do, but that I don’t think anyone has done, or at least wrote about doing it in a way that I could digest. Many steps involved me wondering, “Well, why wouldn’t this work?” and trying it. Sometimes it just worked, and sometimes I had to go looking for answers, but I was able to navigate a lot of uncharted territory despite only having a pretty basic grasp of electronics, code, and design. I’ve gotten better about just picking a direction and going. It works more than you might expect.
I’m actually pretty happy despite this project not really amounting to anything. I legitimately feel like I learned a lot and proved to myself that I can do more than I expect if I just try. I’m also proud that I stopped when I did. I got to a good point, came up for air, and I was able to decide it was safer to swim back to shore, at least for today.